
This week it's my turn to share with you a trend that I've seen ALL OVER blogland and SCS and I'm embarrassed to say I've never made one before! I thought it was about time I did and share my experience with you all! Below is a supply list and a mini tutorial for you all.
 Supplies:
Patterned paper
Decorative Scissors or Edge Punch
Tacky Tape
Score Pal
Circle Punch
 Step 1:
First off, decide what diameter you want your medallion to be. Once you've decided, cut a strip of cardstock or patterned paper using the radius (or half the diameter) as your width, and about 12" long (For my sample, I cheated and cut two strips from a 6x6 pad and adhered them together!) Now either using decorative scissors or an edge punch, trim the edge of your strip like the picture shows. Just a note: If you're going to trim your strip like this, I'd add about a 1/4" to the width of your strip to account for this. Then in an accordion fashion, score along each divet or invert of your trim to create the accordion effect.

 Step 3:
From a scrap piece of cardstock, punch out a circle large enough to cover the center of your medallion and some of the ridges. Apply adhesive to the piece and while holding down the accordion flat against the table, stick the scrap circle over the center hole on the back of your medallion. I thought the glue from my Zyron sticker maker would be strong enough - it wasn't! So I ended up using my glue tape gun and ran it over the scrap circle a few times to cover the whole piece.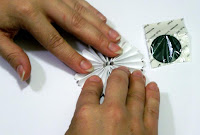

 Step 4:
Turn your piece over and your medallion is complete! No sweat, right?! :) Now comes the fun part - decorating it! Go crazy! You could try using colored images, die cuts or even chipboard letters! The possibilities are endless!
Here's how I used the medallion I made - my first Christmas card of the season!! I adhered a paper flower, a button and made some stigma's out of black wire. I used the Flourish and Everyday Greetings mini sets for a quick and easy card!
 Well, I hope this has inspired you to create a medallion or two on your next craft project!


Stunning project, Sandra :)
ReplyDeleteThank you so much!! Beautiful card.
ReplyDeleteGreat tutorial Sandra! I love the look of these, I need to use this on a card some day too. Your sample is beautiful! LOVE the colors!
ReplyDelete