Showing posts with label ABC Friday. Show all posts

Friday, November 15, 2013

ABC Friday--Altered Dominoes


My duties today as Trendsetter of the week at TSG are to share a project that is Anything But a Card.  I have been itching to try out the altered domino technique so this was the perfect excuse.
This is a really fun craft.  I don't play with my alcohol inks often but they are so beautiful on these dominoes.
For this one I used the beautiful rose image in the "You Are Loved" set.  I inked the domino with the alcohol inks first and then stamped the image in Stazon on some tissue paper.  I colored it with Prismacolor pencils and then used some Claudine Helmuth Multi medium to attach it to the domino.  I heat embossed all the sides and slightly on the edges of the front with gold embossing powder.  The whole image was covered in Glossy Accents and then sprinkled with a few gold microbeads.


This domino was also alcohol inked.  I used Timber Brown Stazon to stamp one of the branch images from the "Give Thanks" set.  I added some Vintage Photo Distress Stickles on the leaves and popped on a couple of pearl flowers from Making Memories.  I attached Scoretape around all the edges of the domino and then covered them in silver microbeads.  I added Silver Stickles around the edge and covered the whole image with Crackle Accents.


The third domino was inked and stamped with the cat tails image from the "Lucky Duck" set.  Once stamped I used my Copic colorless blender pen to remove the ink from parts of the image.  The sides of this domino were also embossed in gold


This trio will make some mice magnets for my refrigerator and I imagine they will be getting some more company since this was so much fun.
Back tomorrow with my final Trendsetter of the week project, Stampbook Saturday.

Friday, November 8, 2013

ABC Friday - Christmas Treat Bag Cover


Hi friends! Sarah back today with Anything But a Card Friday. Today I'm going to show you a quick tutorial on how I make these Treat Bag Covers.


Inside is a cellophane bag filled with whatever yummy goodies you like - chocolate kisses in my case! These are fast and easy to make - they make wonderful stocking fillers!


I've used the wonderful new Snowman Soup set for my Treat Bag Cover. I fussy cut my decorations, but now I have my hands on the matching dies these will be even faster to whip up!

Want to see how easy it is? Let's get going!


Cut a strip of cardstock 3 1/2" by 11". Score at 4 1/2, 5 1/2 and 10". 
Cut a window using any shape you like. 


Cut a piece of paper to fit or stamp a design onto the front of your treat bag cover. I like to cut a frame for my window by die cutting a shape larger than the window, then cutting out a smaller oval on the inside so a small border will show when these are layered together.


I've layered my die cut oval behind my window, then adhered a piece of vellum cardstock for a frosted window look. Acetate works wonderfully and gives a clear view of the goodies inside. I also like to line the inside of the cover with a bright paper that will peek through.


With the flap closed, use a strong punch like a crop-a-dile (or punch multiple times with a normal hand punch) to cut two holes for threading through twine or ribbon.


For a finished look, I like to use large eyelets - make sure you only put these through the first layer or you won't be able to open the cover! Decorate with a pretty border and more paper or stamped designs.


That's it! Punch holes in your cellophane bag and tie it all together with the bag enclosed in the cover. Decorate as desired. I've used a die cut poinsettia, edged with frosted stickles. 


I've used the holly and present images from Snowman Soup, colouring with Copics, adding stickles to the gift and glaze pen to the berries. 

Once you make one of these, you can easily adapt them to any size you wish. You can also forgo the window and use a larger coloured image to decorate the front of your cover. If you make one, please let me know, I'd love to see!

Hugs,
Sarah!

Friday, November 1, 2013

For You Tags

Hello everyone!  It is Danielle checking in for this week's ABC (anything but a card) project with a set of tags.  For those of you who follow my blog you probably I'm sure you're not surprised. ;)

I made four smaller tags using some of the little images from Happy Fall. They were stamped in Jet Black Archival ink on watercolor paper and then colored with Distress Markers.  I added a bit of Diamond Stickles for sparkle and a few rhinestones for accent.


For two of the tags I used leaves and for the other two I paired the birds together.


Thanks for stopping by and check back tomorrow for another project.  :D

Thursday, October 10, 2013

Halloween Treat Holders

For this week's ABC (anything but a card) project, I have some cute Halloween treat holders to share with you. ABC projects are really not my strong suit- I find they take me a LOT of time to create with more mistakes than you can imagine! So, I am going to take the easy way out and show you what I reproduced using my friend Sheri's lovely and easy to follow tutorial! You can find her Youtube video HERE. I basically followed her tutorial to the letter, only changing my stamps and embellies and adding crepe paper to the bottoms.


I used a great new Halloween set, that's perfect for all of your treats and tags~ cleverly named Halloween Tags! This set also has a coordinating Silhouette cut file available for download HERE. I don't have a Silhouette, so I hand cut my stamped images. If you are struggling with how to use these cut files with your TSG stamps, Trendsetter Tangii did an easy-to-understand tutorial last week!! Perfect!!

Some details about my treat tubes:

  • I used TSG's Spiderweb die border to create the web around the top. 
  • I went into my Halloween stash and found some ribbon, glittery embellishments and washi tape that would coordinate.
  • I added Glossy Accents to the main images, as well as the little accents (which are stamps from the set as well), and sprinkled with Tim Holtz Rock Candy glitter. I love that stuff. I can't believe that I have been living under a rock this whole time and just bought a jar.
  • I HATE candy corn. I specifically had to buy some for a prop. I'll probably toss the entire bucket in a few weeks. I'll expect Paypal donations to reimburse my $3.50 I spent to make my TSG pics nicer ;) hehe!
Here are a few close up's of each treat holder! I always make 3 when I do something like this, or my kids flip out, thinking I purposely left someone out!


Thanks for stopping in! I hope you are inspired to make some fun treat holders with some of our awesome Halloween sets!!!

Friday, October 4, 2013

Anything But a Card Friday!

For today's ABC Friday, I decided to make a little framed pretty for our library!  Recently I picked up some burlap from a local art store so I cut it down to size and anchored the corners with some fabulous brads I've had for quite some time.  I used Handwritten and Mixed Media Backgrounds.  

I stamped most of the words & images directly on the burlap, but I also wanted a little more dimension so I added a large heart diecut from patterned paper and stamped the arrow from MMB on white cs and cut  it out.  The arrow is attached with Popdots.  This would make a great gift as well.  The Handwritten set has several perfect words for making a gift for a variety of people/reasons!  Well that's it for me this week... thanks for popping by.  I'll see ya here tomorrow for Stampbook Saturday.

Friday, August 16, 2013

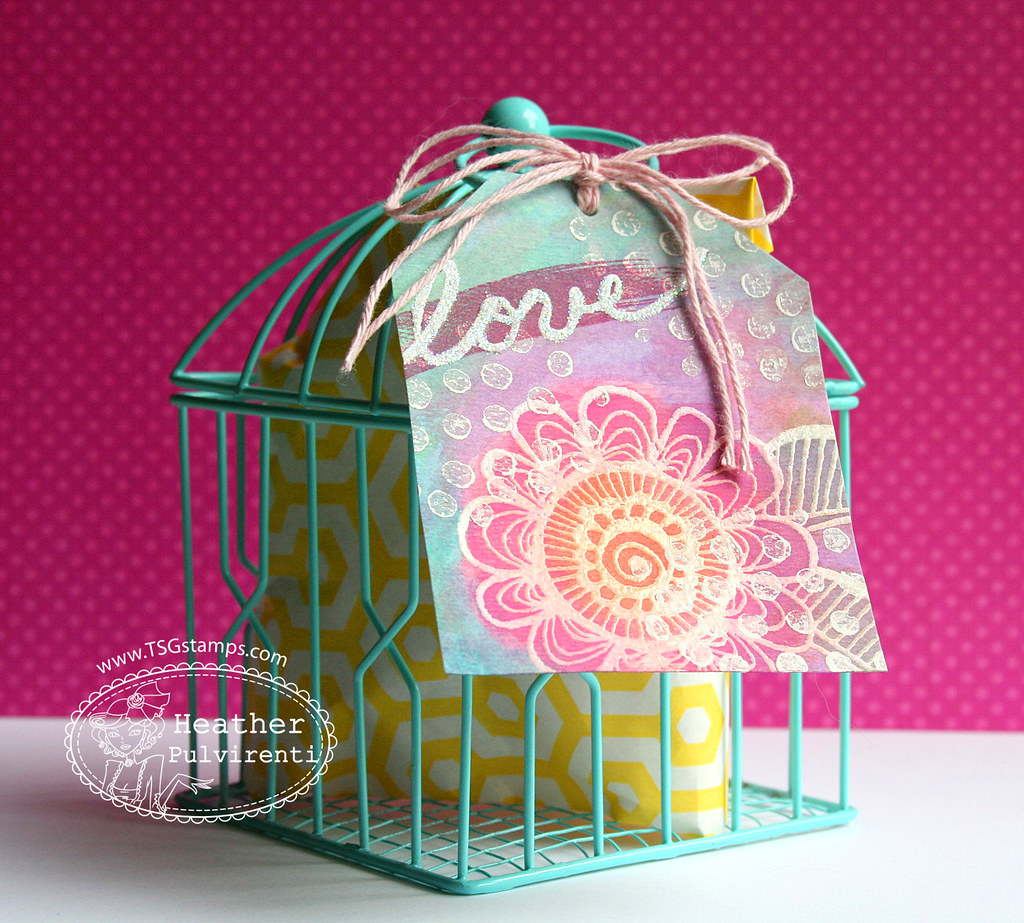
ABC Friday - Love Gift Tag


Hi, everyone! Heather P. here for Anything But a Card Friday... My daughter loves receiving little gifts, and luckily for us, pretty much anything packaged in a pretty way constitutes a "gift"... even cookies! :)

I created this fun little tag for my daughter using a few different There She Goes sets, Dream In Color, Mixed Media Background Builder and Handwritten.  I started with a watercolor paper base, then stamped the flower image in Versamark and heat set it with white embossing powder.  Next, I colored the tag using watercolors, and then once that was dry I stamped the white dot stamp image with a thin coat of paint.  To finish up my tag, I stamped the paint swash in pink ink, and stamped the sentiment with white ink before filling it in with stickles.


Thanks for visiting with me today!


Friday, August 9, 2013

ABC Friday - Fry Box


Hi TSG fans! Sarah back today with Anything but a Card Friday, or should that be fry-day? (I know, bad pun!) I love making treat boxes, they make little gifts or sweet treats so special.

When I started thinking about what I'd like to share today I was reminiscing about the very first template I used when I started discovering the stamping community...and it was a fry box.


You'd like any gift contained in such a cute little box, right?! You can find the printable template for this box here. I've used Flying By to decorate today and I think it turned out so sweet!

The template will print two boxes - I assembled the first one, and used the second to create templates to cut around on my patterned paper (Unforgettable by MME) The edges were lightly sponged with a neutral ink then I had fun decorating!


I stamped and colored the images with copics on x-press it blending card stock before fussy cutting them. The balloons got a coating of gloss paint for lots of shine. I embellished with some die cut felt clouds, the sentiment banner and some liquid pearls.

I also decorated the back of the box for a fun 3D look.

I hope I've inspired you to use your beautifully colored images on more than just cards, if you make a fry box, be sure to send me a link! Happy stamping!

Friday, August 2, 2013

ABC Friday- Bag Tag

It's me, Jenny, again! I wanted to try my hand at a mixed media project, but needed to 'dip my toes' in, so to speak! So I thought maybe a tag would be the perfect smaller canvas to start with! Tobi did a really good tutorial on the TSG blog awhile back and it's really helpful for beginners (like me!)


I used a bold, funky TSG stamp that is perfect for mixed media stamping! Dream in Color. Check it out- it's fun, different and cheap at only $9!!!


I literally had to unwrap everything I used from it's original packaging, lol! I always buy with the intent to use, and then, well......you know how it goes! So even just unwrapping got me psyched! haha

I used Gesso, Molding paste, a stencil, Gelatos, a Pitt Pen, Derwent Inktense pencils, and Perfect Pearls Mist. No word of a lie. ALL STILL IN PACKAGING! 


This was sooooo much fun to make! My fingers were all messy, I got molding paste on my pants, but I felt like a little kid in art class again!!!! I added my tag to a gift bag and threw some tissue in, and voila! A nicely packaged gift for a friend! Who wouldn't love this?


Friday, July 12, 2013

ABC - Friday


Hi Everyone!

It is Friday and that means ABC - Anything but a Card here on the TSG blog- so I'm here today with a super easy summer project that would make a nice little homemade gift set either for yourself (!) or for someone you think deserves it! Some Sugar exfoliating scrub for smooth and soft skin and some Salt water spray for that beachy hair look that I love!

I made use of an empty flour tablet jar and a spray bottle. First I printed the text using the  font on my computer and then stamped a beach scene using the adorable set Beach Bums. Wrapped it around the jar and bottle with some striped paper from Echo Park for borders. I then stamped the little boy and girl, colored and trimmed them and attached them to my containers using foam tape.

The recepies I used:

SALT WATER SPRAY

• 1 cup of water, boil and let cool
• 2 teaspoons of coarse sea salt (the more you use, the more textured your results – just experiment to see what works best for you) Make sure the salt is completely dissolved before you continue.
• 1 teaspoon hair gel Use unscented kind so it doesn't interfere with the fragrance you want.
• ½ tablespoon hair conditioner
• 4-5 drops of coconut oil for beachy smelling hair. or  your favorite scent.

Shake well before using


Sugar Scrub

2/3 cup light brown sugar, packed
1/2 cup almond oil
5-10 drops essential oil (grapefruit)
2-3 drops of food coloring (yellow)


Combine the almond oil, the essential oil and the food coloring in a bowl. Add the sugar and mix thoroughly. Store in a clean, glass or plastic jar.

To use the sugar scrub, gently massage in circular motions over your entire body, but not your face. Wash off in the shower or tub.

That was it from me today, have a wonderful week-end, hugs, Karin

Friday, July 5, 2013

ABC Friday with Tobi

Hi there! It's Tobi Crawford here again and wow! I am so glad you liked my post the other day about Gesso! I am sharing another project today using the same technique, but I promise to share more Gesso ideas in the future!! 


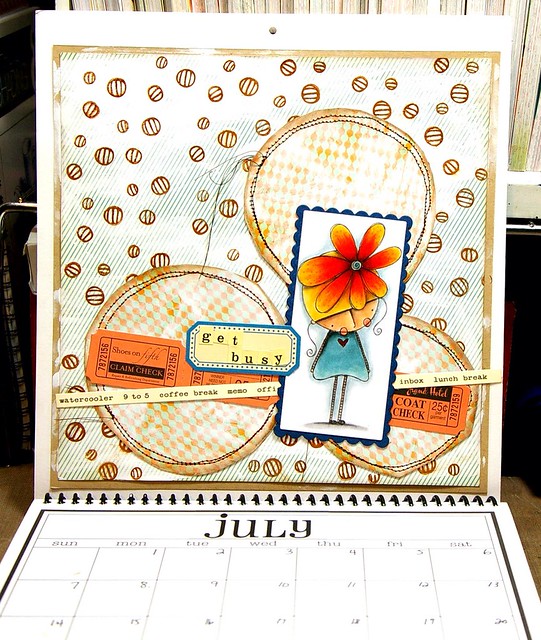
A few years ago I started making design team calendars to keep all of my assignments straight. I'm the kind of person that likes to have assignments on paper instead of digitally so this method is right up my alley. I just like to see everything at a glance instead of a day-at-a-time. I dunno... I'm weird like that I guess. 

So... Can you spot all of the Gesso?? 


I hand-cut the circles and added Gesso with my fingers. I painted the background with Gesso too, but then I added all those little spots (from the Phyllis stamp set) in brown Archival ink on top. It makes a really cool background! 


Then I coloured up a brand-spanking new girl (Amalia's Daisy) with Copic markers and added some other stuff to finish the page. 

Thanks for stopping by!!

Friday, June 14, 2013

ABC Friday–Poultry in Motion Tags

Hi all – it is Danielle again and I have a fun non-card project to share today. I’m a fan of making tags so you know I just had to make a set.  I dug through my stamps and pulled out the Poultry in Motion set as well as the In Stitches set for a bit of background stamping.

PoultryInMotionTag_DanielleLounds

These are big tags but they are still perfect for the little rooster and itty bitty chick.  The tags only differ by the sentiment.

PoultryInMotionTag_Single_DanielleLounds

Images were stamped in Memento Espresso Truffle and colored with Copic markers. The rooster was stamped on white cardstock, cut out and popped over the main image panel with foam dimensional tape.

PoultryInMotionTag_Closeup2_DanielleLounds

I used some fun textures on this card: paper cording, washi tape, red twill ribbon, corrugated cardboard and some pearls.

PoultryInMotionTag_Closeup4_DanielleLounds

Hope you enjoyed the tags. Have a great Friday! :)

-- Danielle

Friday, June 7, 2013

ABC Friday - Tooth Fairy Tins

Kim O'Connell checkin' in to wish you a happy ABC Friday.  Yep.  It's "Anything But a Card" Friday so I have little somethin' somethin' to share with you.

Every kid should have a tooth fairy tin to put those teensy tiny teeth into to make life a little easier for the Tooth Fairy.  Fortunately, we have a "Tooth Fairy Approved" stamp set that is perfect for making tooth fairy tins!  


I decorated the tins inside and out.


You can package them up using a clear bag and creating a topper.


I get my 2 oz. screw top lids tins (6518200P) right HERE and the clear bags right HERE.  
If you would like to purchase the Tooth Fairy Approved stamp set, you can find it HERE!

Friday, May 31, 2013

ABC Friday: wine bottle tag

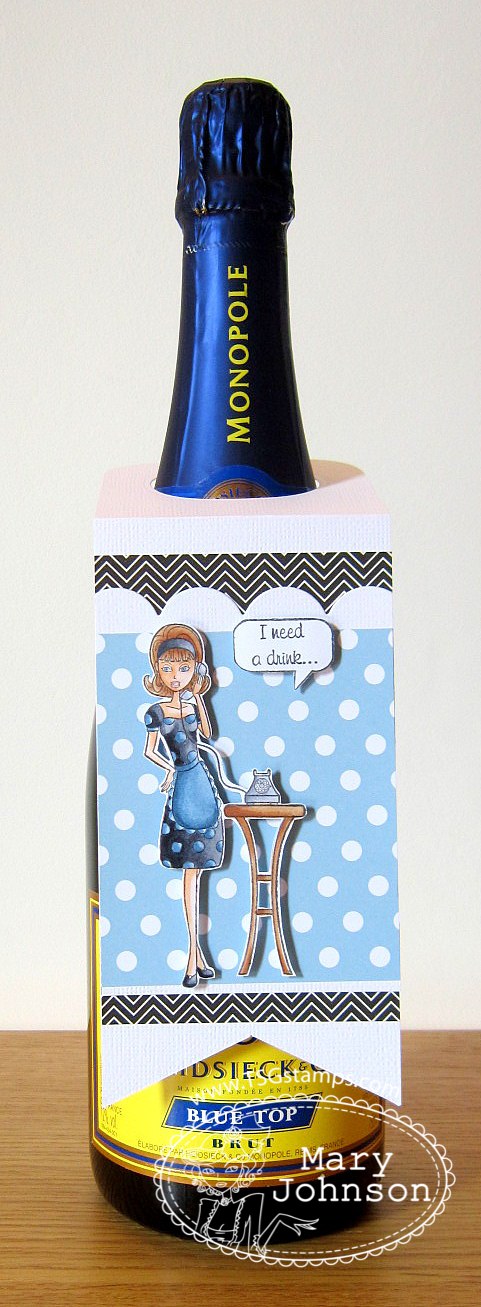
It's Friday which means it's the end of another working week for me, Mary J, so I'm happy!  And what I really look forward to on a Friday after work is a large glass of wine!  And happily my friends also like to share a bottle with me so I decided to get a bottle of champers to share with one of them and I made this wine bottle tag to present it with...


Mmmmmm, I am going to be popular!  Here's a close up because that photo is not great...


I love this retro mama!  She is from the Domestic Goddess set by illustrator Pien DaPino and it's perfect for those fun cards us women like to laugh at!  I used a variety of Pink Petticoat papers and a large scallop border die by My Favorite Things.

Okay, well I'm off to enjoy this bottle with my friend - I hope you have a lovely evening planned too.  I'll be back tomorrow with Stampbook Saturday!

Mary J x
 

Thursday, May 9, 2013

ABC Friday: Woodburning Stamped Images

Hi everyone! Wendy here and I'm back to give you a quick demo on how I created the wood burned bangle from Release Week using your favorite stamps! The new Dream In Color with its whimsical style and thick lines is perfect for woodburning/pyrography! 


Supplies Used: your favorite There She Goes stamp, Pyrography Tool, wood frame or bangle, watercolor pencils, a light brown dye base ink (Distress Ink-Linen), antique glaze or brown acrylic paint, buttons, twine

Using a light brown ink, stamp your image. I prefer to use a light brown ink, in case I choose to omit a few details when wood burning, the light brown ink will blend into the wood and not be noticed. If you really needed to your could sand any remaining ink away. 

The type of wood is important when wood burning. You want a wood with very little grain and imperfections. Basswood found in craft stores is great to begin with. Be sure to use untreated wood and make sure there is proper ventilation.

There are a number of pyrography tools on the market. I just use a basic set from Walnut Hollow that I picked up at a craft store years ago. 
  

After letting the tool heat up, I slowly outlined the stamped flowers with the flow tip.  You will really want to practice with the different wood burning tips on scrap wood to see how each burns. Take your time and use even pressure. Let the tool do all the work! 

After wood burning the entire design, all that was left to do was color the images in with watercolor pencils and wipe on some antiquing glaze. A few buttons and twine finish off the frame. 


Just a reminder, there is still plenty of time to play along with this week's TSG206 Challenge/Paper Piecing! Have a great Friday and I'll see you tomorrow for Stampbook Saturday! :)